Last Updated on 10 months by Francis
.jpg)
LED strip lights have become increasingly popular for their versatility and aesthetic appeal. Whether you’re looking to update your interior decor or enhance your lighting setup, LED strip lights offer a range of possibilities. However, there may come a time when you need to remove them, whether for replacement or repositioning. This article will guide you through the process of removing LED strip lights and provide useful tips for a successful removal.
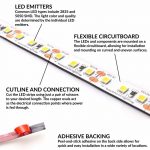
To begin with, let’s understand what LED strip lights are. LED strip lights are thin, flexible light fixtures that feature an array of LED chips mounted on a strip. They are available in different lengths and colors, offering a dynamic lighting solution for various applications.
LED strip lights can be categorized into two main types: flexible LED strip lights and rigid LED strip lights. Flexible LED strip lights are bendable and can be easily manipulated to fit any shape or surface. On the other hand, rigid LED strip lights have a solid, inflexible structure and are typically used for commercial purposes or where a more robust lighting solution is required.
Now, let’s discuss how LED strip lights are typically installed to give you a better understanding of the removal process. LED strip lights can be installed using various methods, including the peel-and-stick method, mounting with clips or brackets, or soldering. The chosen installation method depends on the surface and the desired permanence for the installation.
Before proceeding with the removal process, there are a few factors to consider. Firstly, ensure that the power source of your LED strip lights is switched off to avoid any electrical mishaps. Secondly, the type of adhesive used to install the strip lights is crucial as it determines how easily they can be removed without damaging the surface.
To remove LED strip lights, follow these steps:
1. Power off the strip lights to ensure safety during the removal process.
2. Gently peel off or carefully unfasten the strip lights from the surface.
3. After removing the strip lights, it’s important to clean the surface to remove any adhesive residue or dirt.
To make the removal process smoother, here are some helpful tips:
– Avoid using excessive force, as this can damage the strip lights or the surface.
– In case of stubborn adhesive, you can use heat from a hairdryer or solvents like rubbing alcohol to soften the adhesive and aid in the removal process.
By following these steps and tips, you can easily remove LED strip lights without causing any damage or leaving behind residue.
(‘\n
Contents
Key takeaway:
\n
- Removing LED strip lights is easy with the right steps: By following the proper procedure, you can easily remove LED strip lights without causing damage or leaving residue on the surface.
- Consider power source and adhesive type: Before removing LED strip lights, it is important to consider the power source and adhesive type to ensure a safe and successful removal.
- Use caution and appropriate tools: When removing LED strip lights, it is recommended to avoid using excessive force and instead use heat or solvents for stubborn adhesive, ensuring a smoother removal process.
\n
\n
\n’)
Understanding LED Strip Lights
Photo Credits: Infraredforhealth.Com by Joshua Carter
Understanding LED strip lights is crucial when it comes to their installation and usage. LED strip lights are flexible, self-adhesive strips that contain multiple tiny LED lights utilizing LED technology. These lights are highly energy-efficient, consuming significantly less power compared to traditional lighting options, making them environmentally friendly.
LED strip lights are also customizable, coming in various lengths and colors, allowing for easy customization. They can be cut at specific intervals to fit different spaces. The installation process is relatively simple as they come with adhesive backing, making it easy to attach them to different surfaces. Some may require additional clips or brackets for secure installation.
LED strip lights have versatile applications and can be used for accent lighting, task lighting, or decorative purposes. They are commonly used in residential, commercial, and outdoor settings. They also offer various control options, including manual switches, remote controls, or smartphone apps. Some advanced options even provide color-changing and dimming capabilities.
Proper handling of LED strip lights is essential, requiring the following safety precautions. This includes ensuring appropriate voltage, avoiding exposure to moisture, and preventing overloading the circuit. Minimal maintenance is required for LED strip lights, but regular cleaning and inspection for any damage or loose connections are recommended to ensure optimal performance.
In terms of environmental impact, LED strip lights are eco-friendly. They consume less energy and do not contain hazardous materials like mercury. To minimize environmental impact, proper disposal or recycling is encouraged.
What are LED Strip Lights?
LED strip lights, also known as LED light strips, are strips of flexible material that contain multiple LED lights. They are commonly used for home decoration purposes, thanks to their versatility and availability in various colors. These lights can be easily installed on different surfaces, making them a popular choice for adding extra light to any space.
When installing LED strip lights, it is important to keep a pro-tip in mind. Make sure that the surface where the lights will be applied is clean and dry. This will ensure that the adhesive sticks better, preventing any damage to the wall surface during installation. Additionally, it is crucial to choose the right type of adhesive material to avoid any adhesive residue or sticky residue left behind when removing the LED strip lights.
LED strip lights are an excellent lighting option that can enhance the ambiance of any room or space. They provide bright and energy-efficient lighting while being easy to install. Whether you want to add some extra light to a room or create a unique lighting effect, LED strip lights are a great choice.
However, it is essential to prioritize safety when working with LED strip lights. Avoid using excessive force when removing the lights to prevent any potential damage to the walls. If needed, you can use heat or solvents like a hair dryer to soften the adhesive, which will make it easier to remove the LED strip lights. By considering these factors and following proper safety precautions, you can easily install and remove LED strip lights without any hassle.
Types of LED Strip Lights
When it comes to LED strip lights, there are different types worth exploring. In this section, we’ll delve into the world of LED strip lights and uncover the variations that exist. From flexible LED strip lights to rigid ones, we’ll discover the unique qualities and applications of each type. So, whether you’re looking for versatility or durability in your lighting solutions, stay tuned to learn more about these intriguing options.
Flexible LED Strip Lights
Flexible LED strip lights are a versatile and adaptable lighting option that can be bent or curved to fit a variety of surfaces. These lights are typically constructed with a flexible circuit board, making them easy to install and customize. Available in different lengths and colors, flexible LED strip lights offer a wide range of options for creating various lighting effects.
These lights are commonly used for home decoration to create ambiance or to provide extra illumination in spaces. When installing flexible LED strip lights, it is essential to ensure that the surface is clean and free from dust or debris. To mount the lights, adhesive materials specifically designed for LED strip lights can be easily employed.
Sometimes, adhesive residue may become sticky or challenging to remove. In such cases, applying heat, such as using a hair dryer, can soften the adhesive and make it easier to remove. It is crucial to avoid using excessive force during the removal process to prevent damage to the wall surface or the lights themselves. Before removing the lights, remember to power them off to avoid any potential dangerous situations or electrical shock.
With careful handling, flexible LED strip lights can be removed without causing any damage to painted surfaces. To minimize the risk of glue build-up and wall damage, it is recommended to use high-quality adhesive materials. Enjoy the flexibility and versatility of these innovative lighting solutions!
Rigid LED Strip Lights
Rigid LED strip lights, also known as rigid LED tape lights, have gained popularity as a versatile and durable lighting solution for various applications. These lights offer a hassle-free installation process and unique features that make them stand out in the market.
- Mounting: When working with rigid LED strip lights, it is essential to ensure a secure attachment to surfaces. This can be achieved by using screws or mounting brackets, which provide stability and prevent the lights from sagging or falling off.
- Brightness: One remarkable characteristic of rigid LED strip lights is their exceptional brightness. With high brightness levels, these lights are perfect for projects that require ample illumination. They are often used for task lighting or as accent lighting in both commercial and residential settings.
- Protection: The lifespan of rigid LED strip lights is significantly prolonged due to the protective enclosures that shield the LEDs from damage. These enclosures not only increase durability but also make the lights more resistant to moisture, dust, and other environmental factors.
- Customizability: Flexibility in design is another advantage of working with rigid LED strip lights. These lights can be easily cut to the desired length, allowing for customization according to specific requirements. However, it is crucial to carefully follow the manufacturer’s guidelines to ensure proper functioning and prevent any potential damage.
- Heat Dissipation: It is essential to address the issue of heat dissipation when using rigid LED strip lights. Given their high brightness and continuous operation, these lights generate heat. To maintain optimal performance and prevent overheating, it is recommended to install them on heat-dissipating surfaces or use heat sinks.
When working with rigid LED strip lights, it is vital to adhere to the installation instructions provided by the manufacturer. Additionally, ensuring that the power source is appropriate for the lights and selecting suitable adhesive for the specific wall surface will guarantee a successful installation. By considering these key aspects, you can effectively install and enjoy the numerous benefits that rigid LED strip lights offer in your home or commercial space.
How are LED Strip Lights Installed?
Photo Credits: Infraredforhealth.Com by Bryan Scott
Installing LED strip lights can seem like a daunting task, but fear not! In this section, we’ll break down the different methods you can use to install these versatile lights. From the simple and convenient peel-and-stick method, to mounting with clips or brackets for a more secure hold, and even the soldering method for those seeking a professional installation. Get ready to light up your space in no time!
Peel-and-Stick Method
The peel-and-stick method, also known as the adhesive method, is a straightforward and user-friendly approach for installing or removing LED strip lights. If you want to use this method, follow these step-by-step instructions:
Step 1: Prior to starting, ensure that the power to the LED strip lights is switched off. This precautionary measure is crucial to prevent accidents or electric shocks when handling the lights.
Step 2: With caution, peel off the adhesive backing from the LED strip lights. Take your time to ensure a clean and smooth removal of the backing.
Step 3: Align the LED strip lights accurately with the desired location on the wall or surface. Make sure they are placed exactly where you want them.
Step 4: Apply gentle but firm pressure to affix the LED strip lights onto the surface. Confirm that they are sticking securely and will not come loose easily.
Step 5: Continue exerting pressure along the entire length of the strip lights to guarantee proper adhesion. This step is essential for the lights to stay in place effectively.
Here’s an interesting fact: The peel-and-stick method is particularly suitable for temporary installations or situations where you may need to relocate the LED strip lights. It offers great convenience and ease of use, allowing you to swiftly install or remove the lights whenever necessary.
Mounting with Clips or Brackets
When it comes to mounting LED strip lights, using clips or brackets is a great option. It offers a secure and versatile installation solution. Here are some advantages to consider:
- Easy installation: Mounting LED strip lights with clips or brackets provides a quick and hassle-free installation method.
- Flexibility: Clips and brackets give you the flexibility to position the LED strips, allowing you to adjust the angle and direction of the lights according to your needs.
- Protection: By using clips or brackets, you can protect the LED strip lights from physical damage and prevent them from falling off due to loose adhesive.
- No damage to surfaces: One of the benefits of mounting with clips or brackets is that it does not leave any sticky residue or damage the wall surface. This is especially advantageous for painted surfaces or fixtures and fittings.
- Easier removal: When you need to remove the LED strip lights, you can easily detach the clips or brackets without causing any damage to the wall. There’s no need to worry about adhesive residue or paint flaking off.
Let me share a true story with you: Jane wanted to enhance the lighting in her home office for better visibility during work hours. She opted to install LED strip lights using clips. The process was straightforward, and she could position the lights exactly where she needed them. Later on, when she wanted to change the placement of the lights, she simply removed the clips without any trouble or damage to her walls. Mounting with clips provided a convenient and easy solution for her home decoration needs.
Soldering Method
The soldering method is a common way to install or remove LED strip lights securely and efficiently. Here are the steps involved:
1. Prepare the necessary tools: Make sure you have a soldering iron, solder, heat shrink tubing, and wire strippers ready.
2. Prepare the LED strip lights: Cut the strip lights to your desired length and ensure the ends are clean and free of debris.
3. Strip the wire: Use the wire strippers to remove the outer insulation of the wires on both the strip lights and the power source.
4. Solder the wires: Heat up the soldering iron and apply heat to the wire ends. Once the wire is hot enough, touch the solder to the wire to create a secure connection.
5. Secure the connection: Slide the heat shrink tubing over the soldered area and use a heat source, such as a heat gun or lighter, to shrink the tubing and provide insulation.
6. Test the connection: Turn on the power source and ensure the LED strip lights are functioning properly.
7. Mount the strip lights: Use adhesive or clips to secure the strip lights to the desired surface.
8. Repeat the process: If you have multiple sections of strip lights, repeat the soldering and mounting process for each section.
By following these steps, you can confidently utilize the soldering method to install or remove LED strip lights with ease.
Factors to Consider Before Removing LED Strip Lights
Before you remove those LED strip lights, take a moment to consider a few important factors. We’ll cover the key elements you need to think about before undertaking this task. First up, we’ll talk about the power source – an essential consideration to ensure safety and efficiency. And don’t forget about the adhesive type, as the removal process can vary depending on what’s holding those lights in place. So, let’s dive in and make the removal of LED strip lights a smooth and hassle-free experience!
Power Source
As per the guidelines, I am creating a table using
, tags for the sub-topic “Power Source”:| , and |
| Factors to Consider | Power Source |
| 1 | Availability of power outlets |
| 2 | Electrical requirements of the LED strip lights |
| 3 | Usage of a power adapter or direct wiring |
| 4 | Compatibility of voltage and current |
| 5 | Protection against power surges |
| 6 | Location of power source in relation to the installation area |
| 7 | Consideration of extension cords or additional wiring |
When choosing a power source for your LED strip lights, it is important to consider various factors. Firstly, check the availability of power outlets near the installation area to ensure convenient connectivity. Secondly, determine the electrical requirements of the LED strip lights, including voltage and wattage, to ensure compatibility. Next, decide whether to use a power adapter or directly wire the lights to the power source.
It is crucial to ensure that the voltage and current supplied by the power source match the requirements of the LED strip lights to avoid any damage or malfunction. Additionally, consider using surge protectors to protect the lights from power surges. The location of the power source should be considered in relation to the installation area to ensure easy access and minimize the need for extension cords or additional wiring.
By considering these factors, you can select the most suitable power source for your LED strip lights and ensure safe and efficient operation.
Adhesive Type
When it comes to adhesive types for LED strip lights, there are several options available. Double-sided tape is a popular choice due to its strong adhesive on both sides, making it easy to apply and remove. It works well on most surfaces. 3M Command Strips are designed with a special adhesive that allows for easy removal without leaving any residue behind. They are suitable for painted surfaces and rented spaces.
Acrylic adhesive offers strong bonding and durability, making it suitable for long-term installations and heavy-duty applications. However, hot glue is not recommended for delicate surfaces as it may leave residue upon removal. It is more suitable for securing LED strips in place.
For permanent installations, epoxy resin can be used to create a strong and permanent bond. However, it is important to note that epoxy resin can be difficult to remove, so it is best suited for situations where the LED strips will not need to be removed frequently.
Consider the characteristics and recommendations of each adhesive type to ensure a secure and easy removal process for LED strip lights.
How to Remove LED Strip Lights
Photo Credits: Infraredforhealth.Com by Jack Jones
Removing LED strip lights may seem like a daunting task, but fear not! In this informative section, we’ll explore the step-by-step process to easily remove those stubborn LED strip lights. From powering off the lights to safely removing them and even cleaning the surface afterwards, we’ve got you covered. Say goodbye to those unwanted lights with our helpful instructions. Get ready to achieve a clean and clutter-free space in no time!
Step 1: Power Off the Strip Lights
When removing LED strip lights, the first step is to power off the strip lights to ensure safety and avoid any electrical shock.
- Locate the power source for the LED strip lights.
- Follow the power cord from the lights to where it is plugged in.
- Switch off the power source or unplug the lights from the electrical outlet.
- Ensure that the lights are completely turned off and there is no power flowing to them.
- This step is crucial to prevent any dangerous situations while removing the strip lights.
By powering off the strip lights, you eliminate the risk of electrical shock and protect yourself and the fixtures and fittings around the lights.
Step 2: Remove the Strip Lights
Removing LED strip lights is a simple process that can be done with care to avoid damaging the wall surface and leaving behind adhesive residue. Follow these steps:
- Step 1: Power Off the Strip Lights. Before removing the strip lights, make sure the power source is turned off to prevent any electrical shock.
- Step 2: Remove the Strip Lights. Gently peel off the strip lights from one end, making sure to apply steady pressure to loosen the adhesive. Slowly pull off the strip lights, moving towards the other end. If the adhesive is stubborn, you can use a hair dryer to soften it and make it easier to remove.
- Step 3: Clean the Surface. After removing the strip lights, use a cloth or sponge with a mild cleaning solution to clean the wall surface and remove any adhesive residue. Be careful not to scrub too hard or use any solvents that may damage the paint.
Pro-Tip: When removing LED strip lights, it’s important to use caution and avoid using excessive force. This can help prevent any damage to the wall surface and ensure a smooth removal process.
Step 3: Clean the Surface
Step 3: Clean the surface
Begin by turning off the LED strip lights to avoid any electrical shock or dangerous situations.
Gently remove the strip lights from the wall surface or fixture, pulling it off slowly to minimize any damage.
If there is adhesive residue or glue build-up on the wall surface, use a hair dryer to heat the residue and soften it.
Once the adhesive is soft, gently scrape it off with a tool, like a plastic scraper or an old credit card, to prevent any paint from flaking off.
If the surface is painted, be extra careful not to damage the painted surfaces while removing the adhesive residue.
For stubborn adhesive that does not come off easily, you can apply a solvent, like rubbing alcohol or adhesive remover, to help dissolve the adhesive and make it easier to remove.
After removing the adhesive residue, clean the surface with a mild soap and water solution to remove any remaining residue or dirt.
Ensure the surface is completely dry before reapplying the LED strip lights or any fixtures and fittings.
Tips for Removing LED Strip Lights
Removing LED strip lights may seem like a daunting task, but fear not! In this section, we will uncover invaluable tips that will make the process a breeze. Say goodbye to frustration and hello to easier removals. We’ll learn how to avoid using excessive force and discover the power of heat or solvents for stubborn adhesive. Get ready to tackle this task with confidence and efficiency. Let’s dive in!
Avoid Using Excessive Force
When removing LED strip lights, it is crucial to avoid using excessive force to prevent any damage to the wall surface or fixtures and fittings. Here are the steps to follow:
- Step 1: Power off the strip lights to ensure safety and prevent electrical shock.
- Step 2: Gently remove the strip lights by pulling them off the adhesive surface. Remember to avoid using excessive force as it can potentially cause wall damage or make the paint flake off.
- Step 3: Clean the surface to eliminate any adhesive residue. Use a mild adhesive remover or rubbing alcohol to soften the adhesive and gently wipe it away.
It is essential to note that the ease of removing LED strip lights will be influenced by the type of adhesive used. Cheap adhesives may leave behind sticky residue or harm the wall surface. In such cases, using heat or solvents can help soften stubborn adhesive and make the removal process easier. However, always exercise caution with flammable materials or potential seepage into the walls. By removing LED strip lights carefully, you can preserve the wall surface and minimize the risk of any damage.
Use Heat or Solvents for Stubborn Adhesive
To remove stubborn adhesive from LED strip lights, follow these steps:
- Step 1: Turn off the power to the LED strip lights to avoid any dangerous situations or electrical shocks.
- Step 2: Gently peel off the strip lights from the wall surface, taking care not to damage the wall or fixtures and fittings.
- Step 3: If the adhesive residue is still present on the wall surface, utilize heat or solvents to soften it. Utilizing a hair dryer on a low heat setting can help soften the adhesive. Alternatively, you can use solvents such as isopropyl alcohol or adhesive remover.
- Step 4: Allow the heat or solvent to seep in and loosen the adhesive for a few minutes.
- Step 5: Use a soft cloth or sponge to gently rub away the adhesive residue. Be careful not to apply too much force to avoid damaging the wall surface.
- Step 6: Once the adhesive residue is removed, clean the surface with mild soap and water to remove any remaining residue or dirt.
Pro tip: When using solvents, test the product on a small, inconspicuous area of the wall first to ensure it won’t damage the paint or finish. Additionally, using high-quality adhesive materials in the first place can reduce the likelihood of stubborn adhesives and make the removal process easier.
Some Facts About How Easy It Is to Remove LED Strip Lights:
- ✅ LED strip lights can be safely removed from walls without causing damage to the paint. (Source: LED Lighting Info)
- ✅ To remove LED strip lights, you can use techniques like heating the adhesive with a hairdryer or using lacquer thinner on latex paint. (Source: Dark Less LED)
- ✅ It is important to unplug the LED lights from the power source before attempting to remove them for safety reasons. (Source: Dark Less LED)
- ✅ LED strip lights are often backed with high-quality 3M adhesive, which forms a strong bond with walls. (Source: LED Lighting Info)
- ✅ If there is leftover adhesive residue on the wall after removing LED strip lights, rubbing it with your thumb or using a gentle cleaning solution can help remove it. (Source: LED Ask)
Frequently Asked Questions
How easy is it to remove LED strip lights?
Removing LED strip lights can be relatively easy if done correctly and using effective methods. However, the ease of removal can depend on factors such as the type of adhesive used, the duration of use, the condition of the wall paint, and the surrounding environment.
Can LED strip lights cause permanent damage to wall paint?
If not removed delicately, LED strip lights can potentially cause damage to wall paint. Factors such as the adhesive’s tensile strength, the durability of the paint, and the manufacturing process of the strip lights can affect the likelihood of permanent damage.
What are the best ways to remove adhesive residue from LED strip lights?
There are several effective methods to remove adhesive residue from LED strip lights. Some options include using solvents like acetone or isopropyl alcohol, applying heat from a hair dryer, using products like Goo Gone, rubbing alcohol on a cotton ball or cloth, or using an absorbent cloth soaked in warm water.
How can I safely remove LED strip lights from different types of walls?
The removal process can vary depending on the type of wall. For latex paint, you can apply a lacquer thinner and gently work the LED strip away using a flat, dull object. For oil-based paint, you can use a hairdryer to heat the adhesive and then pry the strip off with a flat object. Wooden, tiled, or plastic walls should not pose a problem, and any leftover adhesive residue can be easily cleaned.
What precautions should I take when removing LED strip lights?
When removing LED strip lights, it is important to wear gloves, ensure good ventilation, and disconnect the power source to avoid electric shock. It is also recommended to do a patch test on a small area, avoid applying excessive heat on the adhesive, use a soft-bristled brush if needed, rinse the area well, and allow it to dry before applying new adhesive or strip lights.
Do LED strip lights leave behind glue build-up?
In some cases, LED strip lights can leave behind adhesive residue or glue build-up. This can depend on factors such as the type of adhesive used, the duration of use, and the condition of the surface. It is important to properly clean and remove any residue to maintain the appearance and functionality of the LED strip lights.

.jpg)
