Last Updated on 3 months by Francis
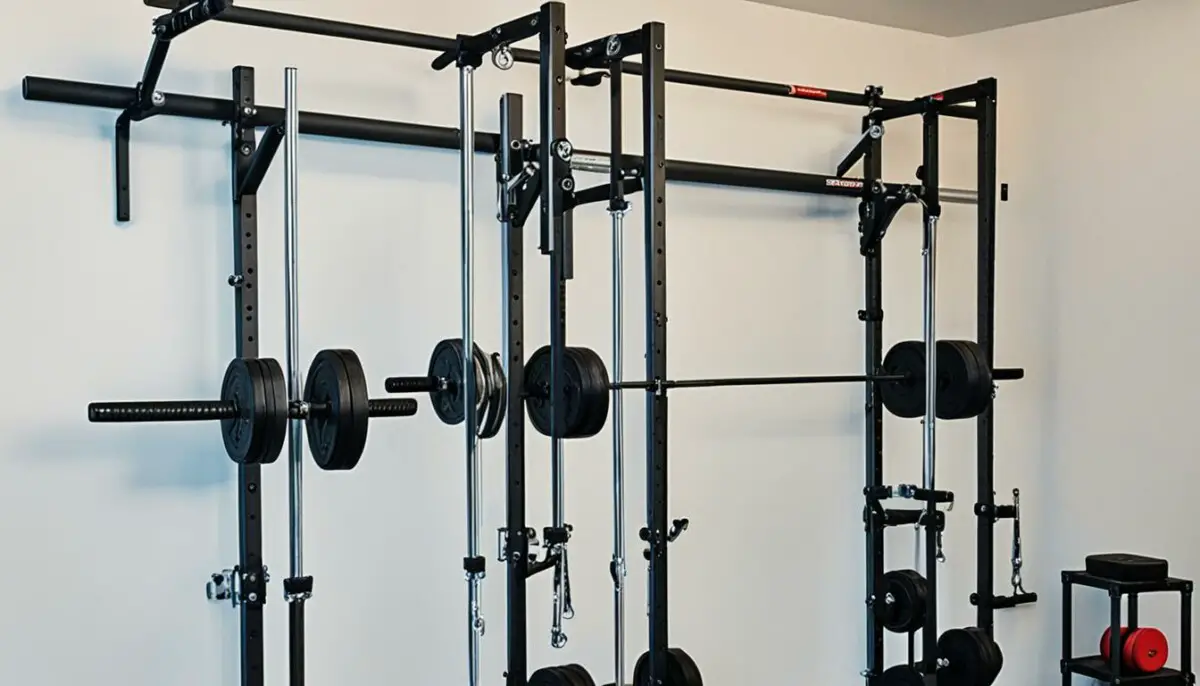
Transform your home gym and save space by building a DIY wall mounted squat rack. With just a few supplies and basic woodworking skills, you can create a sturdy and reliable rack that will support heavy weights. Say goodbye to clutter and hello to an efficient workout space!
Whether you’re a seasoned weightlifter or just starting your fitness journey, a wall mounted squat rack is a must-have for a home gym. It provides a safe and stable platform for performing squats, bench presses, and other exercises that target your lower body and improve overall strength. Plus, it frees up valuable floor space, allowing you to maximize your workout area.
Contents
Key Takeaways:
- Building a DIY wall mounted squat rack is a cost-effective way to enhance your home gym.
- You’ll need basic woodworking skills and a few supplies.
- A wall mounted squat rack saves space and provides a sturdy platform for a variety of exercises.
- Consider adding additional features like a pull-up bar attachment to create a complete home gym setup.
- If you’re on a budget, explore cheap DIY squat rack ideas using simple materials.
Supplies for Building a DIY Squat Rack

When it comes to building your own DIY squat rack, having the right supplies is crucial. Here’s a list of everything you’ll need to create a sturdy and reliable wall-mounted weight rack for your home gym:
| Supplies | Quantity |
|---|---|
| Pine 2″x4″x8′ framing studs | 6 |
| Pine 1″x6″x6′ fence planks | 2 |
| Oak 1″x4″x8′ finished boards | 3 |
| Oak 1″x6″x4″ finished board | 1 |
| Black walnut 1″x3″x7″ (optional) | 1 |
| Maple 4 1/2″T x 3 13/16″ x 3/4″ boards | 2 |
| 3″x1/4″ SPAX bolts | 20 |
| 3/8″x5″ lug bolts | 4 |
| 1/4″x5″ bolts | 8 |
| 1 3/8″ screws | 1 lb |
| 2′ steel grounding rod | 1 |
| Wood glue | – |
Image: Supplies for Building a DIY Squat Rack
By gathering these materials, you’ll have everything you need to create your own homemade squat rack, enabling you to enjoy strength training and weightlifting exercises in the comfort of your own home. Whether you’re looking to save money or simply enjoy the satisfaction of building your own gym equipment, this DIY project is a fantastic option.
Step 1: Building the Vertical Posts

The vertical posts are an essential component of your DIY squat rack. They provide the support and stability needed to bear the weight of your routine exercises. By following these steps, you can create strong and reliable vertical posts for your homemade squat rack.
-
Gather the necessary materials:
- Pine boards
- Oak boards
- Wood glue
-
Cut the boards to size:
- Measure and mark the desired height for your vertical posts.
- Using a saw, carefully cut the pine and oak boards to the specified lengths.
-
Create the structure:
- Apply wood glue to the edges of the pine boards.
- Align the glued edges with the corresponding oak boards to form a sturdy structure.
- Press the boards firmly together and use clamps to hold them in place while the glue dries.
-
Allow the glue to dry:
- Follow the recommended drying time provided by the wood glue manufacturer.
- Ensure that the glued joints have fully cured before proceeding to the next step.
Quote:
By properly constructing the vertical posts, you’ll have a solid foundation for your DIY squat rack, ensuring its durability and reliability during your workouts.
Once you have completed building the vertical posts, you can proceed to the next step of drilling indexed holes for adjustable bar positions.
Step 2: Drilling Indexed Holes for Adjustable Bar Position

Once you have built the vertical posts for your DIY squat rack, the next step is to drill indexed holes for adjustable bar position. This crucial step allows you to customize the height of the barbell to match your workout needs and preferences.
Start by measuring and marking the hole positions on the sides of the posts. It’s important to be accurate with your measurements to ensure that the bar sits straight and level during your exercises.
Use a drill with a 3/4″ drill bit to create the holes. Make sure to drill completely straight through the posts for a secure and reliable result. The indexed holes will provide multiple options for positioning the barbell, accommodating different exercises and users.
Optional: For a smoother and more finished look, you can round the edges of the holes using a router. This step is not essential but can add a touch of professionalism to your homemade squat rack.
The indexed holes in your DIY squat rack give you the flexibility to adjust the barbell height for various workouts and users. Whether you’re performing squats, lunges, or other strength exercises, having an adjustable bar position ensures optimal form and targeted muscle engagement.
Step 3: Building the Rack Blocks

The rack blocks are essential components of your DIY squat rack, as they slide up and down the vertical posts to secure the barbell during your strength training sessions.
To construct the rack blocks, you’ll need a combination of plywood, oak, pine, and maple boards. These materials will provide the necessary strength and durability for the blocks to withstand the weight of the barbell.
Here’s a step-by-step guide to building the rack blocks:
- Cut the plywood: Begin by cutting the plywood into rectangular pieces, ensuring that they are the appropriate size to fit within the dimensions of your squat rack.
- Attach oak reinforcements: Use oak boards to reinforce the plywood blocks. Attach the oak boards to the edges of the plywood using wood glue and screws for added strength.
- Create sliding mechanism: To enable the blocks to slide smoothly along the vertical posts, attach pine or maple boards to the sides of the plywood blocks. These boards should fit snugly against the posts without any wobbling.
- Secure the barbell support: Install a solid piece of oak board across the top of the rack blocks to serve as the support for the barbell. Make sure it is securely fastened to prevent any movement or instability.
Once you have completed these steps, you should have a set of sturdy rack blocks that will effectively hold the barbell in place during your strength training exercises.
| Material | Quantity |
|---|---|
| Plywood | 3 sheets |
| Oak board | 4 pieces |
| Pine board | 2 pieces |
| Maple board | 2 pieces |
| Wood glue | 1 bottle |
| Screws | 16 pieces |
Step 4: Building the Lateral Arms/Post Bracket

The lateral arms and post brackets are crucial components that provide stability and support to your DIY squat rack. They connect the vertical posts to the wall, ensuring the entire rack stays securely in place. To build these essential parts, follow the steps below:
- Laminate pine boards: Begin by laminating pine boards to create the lateral arms. This process involves gluing multiple boards together to form a strong and sturdy arm structure. Make sure to use sufficient wood glue and apply pressure while drying for a secure bond.
- Attach the arms to the posts: Once the arms are laminated and dry, use wooden brackets to securely attach them to the vertical posts. The brackets should be positioned at a height that allows for comfortable barbell placement during your workouts.
By building the lateral arms and post brackets, you ensure the structural integrity of your homemade squat rack, allowing you to safely perform your exercises without any worries.
Step 5: Creating the Project Hinges

Now that you have built the main structure of your DIY squat rack, it’s time to add the project hinges. These hinges will allow your squat rack to swing in and out for easy storage, maximizing space in your home gym.
To create the project hinges, you will need wooden boards and screws. Make sure to choose sturdy and durable materials that can withstand the weight of the rack. The hinges should be secure and allow for smooth swinging motion.
Here’s a step-by-step guide to creating the project hinges for your homemade squat rack:
- Measure and mark the desired height for your hinges on the backside of the vertical posts.
- Cut two wooden boards to the desired length for the hinges. These boards should be long enough to provide ample support and stability.
- Attach one end of each board to the backside of the vertical posts using screws.
- Attach the other end of each board to the wall using screws. Make sure to securely fasten the hinges to the wall, ensuring they can handle the weight of the rack.
Expert Tip: To ensure smooth swinging motion, consider adding lubrication to the hinges. This will reduce friction and make it easier to fold and unfold the rack.
Once you have successfully installed the project hinges, you can now enjoy the convenience of easily storing your DIY squat rack when not in use. Simply fold it against the wall and reclaim valuable space in your home gym.
Step 6: Attaching Wall Plates
Once the main structure of your DIY squat rack is complete, it’s time to provide additional support and stability by attaching wall plates. Wall plates are essential for spreading the load across multiple studs, ensuring that your rack is securely attached to the wall.
To attach the wall plates, you’ll need sturdy wooden planks that can withstand the weight of the rack and the load you’ll be lifting. Measure and cut the planks according to the desired length and width, making sure they align with the studs on the wall. Using a level and a pencil, mark the positions where the screws will go.
Securely attach the wall plates to the studs using screws, making sure they are evenly spaced and aligned. This will ensure that the weight is distributed evenly across the wall, providing maximum stability for your homemade squat rack.
Here is an example of how the wall plates can be attached:
| Materials | Quantity |
|---|---|
| Wooden planks | 2 |
| Screws | 8 |
Remember to choose appropriate sizes and lengths for the wooden planks and screws based on the specific requirements of your wall and rack.
With the wall plates securely attached, your DIY squat rack is now ready for use. It’s time to start lifting and enjoying the benefits of your homemade fitness equipment.
Creating Your DIY Fitness Room
If you have the space, why not turn your home gym into a complete DIY fitness room? With your homemade squat rack as the centerpiece, you can maximize your wall space and add additional features to create the ultimate home gym setup.
- Attach a pull-up bar: Add a pull-up bar attachment to your squat rack for a full-body workout. Strengthen your upper body and improve your grip strength with this versatile addition.
- Install shelves: Use the wall space surrounding your squat rack to install shelves where you can store your weights, dumbbells, and other fitness equipment. Keep everything organized and within reach for easy access during your workouts.
- Create a workout station: Dedicate an area of your fitness room to other exercises and equipment. Consider adding a yoga mat, resistance bands, or a weight bench to diversify your training routines.
- Set up a mirror: Hang a large mirror on the wall to check your form and technique while performing exercises. This will help you maintain proper posture and reduce the risk of injury.
“Transforming your home gym into a DIY fitness room allows you to personalize your workout space and create an environment that motivates and inspires you to achieve your fitness goals.”
By customizing your DIY fitness room, you can create an inviting space that makes working out a pleasure. Whether you prefer strength training, cardio, or flexibility exercises, having a dedicated fitness room in your home will encourage you to stay consistent and focused on your fitness journey.
Benefits of a DIY Fitness Room
Having a DIY fitness room offers several advantages:
- You have 24/7 access to your workout space, allowing you to exercise whenever it fits your schedule.
- You can save time and money by avoiding gym memberships and commuting.
- You have complete control over the cleanliness and hygiene of your fitness room.
- You can personalize the atmosphere to suit your preferences, whether it’s playing energetic music, using scented candles, or decorating the walls with motivational quotes.
- You can experiment with different equipment and exercise routines without feeling self-conscious or restricted by crowded gyms.
| Pros | Cons |
|---|---|
|
|
Creating a DIY fitness room is an exciting and rewarding project that allows you to seamlessly integrate exercise into your lifestyle. With your homemade squat rack as the foundation, you can design a space that caters to your fitness goals, preferences, and interests.
Cheap DIY Squat Rack Ideas
If you’re on a budget, don’t worry! There are plenty of affordable and creative ideas for building your own DIY squat rack. With some simple materials and a little bit of ingenuity, you can have an effective squat rack in no time.
One idea is to use plastic buckets as the base of your squat rack. Fill them with concrete mix to provide stability and weight. Then, insert wooden bars into the buckets, securing them firmly. This homemade squat rack is a cost-effective and practical solution for your home gym.
Another option is to repurpose sturdy wooden planks and metal pipes to create a DIY squat rack. Use the planks as the base and vertical posts, and attach the metal pipes between them to hold the barbell. This homemade squat rack is not only affordable but also customizable to your desired height and width.
If you’re feeling adventurous, consider upcycling old bed frames or metal shelving units as the foundation for your squat rack. With some modifications, these materials can provide a sturdy structure for your workouts. Just make sure to secure all components properly and test the stability before using the rack.
Remember, safety is always a top priority, regardless of the materials used. Inspect your homemade squat rack regularly and ensure that it can support your weight and the weights you’ll be lifting.
By getting creative with materials you already have or can easily acquire, you can build a functional and affordable squat rack for your home gym. Let your DIY skills shine and start lifting with confidence!
Conclusion
Building a DIY wall mounted squat rack is a rewarding project that can greatly enhance your home gym and provide you with a reliable and sturdy piece of fitness equipment. By utilizing the right supplies and applying basic woodworking skills, you can create a customized squat rack that perfectly suits your needs.
Not only does a homemade squat rack save you money, but it also allows you to optimize the space in your home gym. With its wall-mounted design, it minimizes clutter and maximizes the available workout area. This means you can focus on your fitness goals without any unnecessary distractions.
Now that you have successfully built your own DIY squat rack, it’s time to enjoy the convenience and efficiency it brings to your workouts. Whether you’re a beginner or an experienced weightlifter, this homemade equipment will provide you with the stability and support you need to perform your squats and other strength training exercises safely.
Embrace the convenience of having a home gym and take your fitness journey to the next level. With your new DIY squat rack in place, you can lift big and reach your goals without even leaving your home. Get ready to transform your body and elevate your workouts with this fantastic piece of homemade fitness equipment.
FAQ
What supplies do I need to build a DIY squat rack?
To build a DIY squat rack, you’ll need pine and oak boards, bolts, screws, wood glue, and steel grounding rod. Full details of the supplies can be found in the article above.
How do I build the vertical posts for my DIY squat rack?
Building the vertical posts involves cutting and gluing pine and oak boards together to create a sturdy structure. The full step-by-step instructions can be found in the article above.
How do I drill indexed holes for adjustable bar positions?
Measure and mark the hole positions accurately on the sides of the vertical posts. Drill 3/4″ wide holes completely straight through the posts to create indexed positions for adjusting the barbell height. Optional: round the edges of the holes for a smoother finish.
What are rack blocks and how do I build them?
Rack blocks are components that hold the barbell and slide up and down the vertical posts. To build rack blocks, you’ll need plywood, oak, pine, and maple boards. Full instructions can be found in the article above.
How do I build the lateral arms and post brackets for my DIY squat rack?
You’ll need to laminate and attach pine boards to create the lateral arms, and use wooden brackets to connect the arms to the vertical posts. Detailed instructions can be found in the article above.
How do I create the project hinges for my DIY squat rack?
The project hinges allow the squat rack to swing in and out for easy storage. You can create them using wooden boards and screws. The hinges should be secure and allow for a smooth swinging motion. Check the article above for more details.
How do I attach wall plates to my DIY squat rack?
Wall plates are attached to the wall to provide additional support and stability for the squat rack. You can use wooden planks as wall plates and attach them to the studs using screws. Refer to the article above for step-by-step instructions.
Can I create a DIY fitness room with the squat rack as the centerpiece?
If you have the space, you can definitely create your own DIY fitness room with the squat rack as the centerpiece. Maximize wall space and add additional features like a pull-up bar attachment to create a complete home gym setup.
Are there any cheap DIY squat rack ideas?
Yes, if you’re on a budget, there are cheap DIY squat rack ideas that you can explore. Using simple materials like plastic buckets, concrete mix, and wooden bars, you can create a functional and affordable squat rack. Check out the article above for more details.
Why should I build a DIY wall mounted squat rack?
Building a DIY wall mounted squat rack allows you to transform your home gym and save space. It also gives you the opportunity to customize the rack to your specific needs and preferences. Plus, it can be a rewarding and enjoyable project to undertake. See the article above for more information.